How to make your own water filter with a bottle step by step.
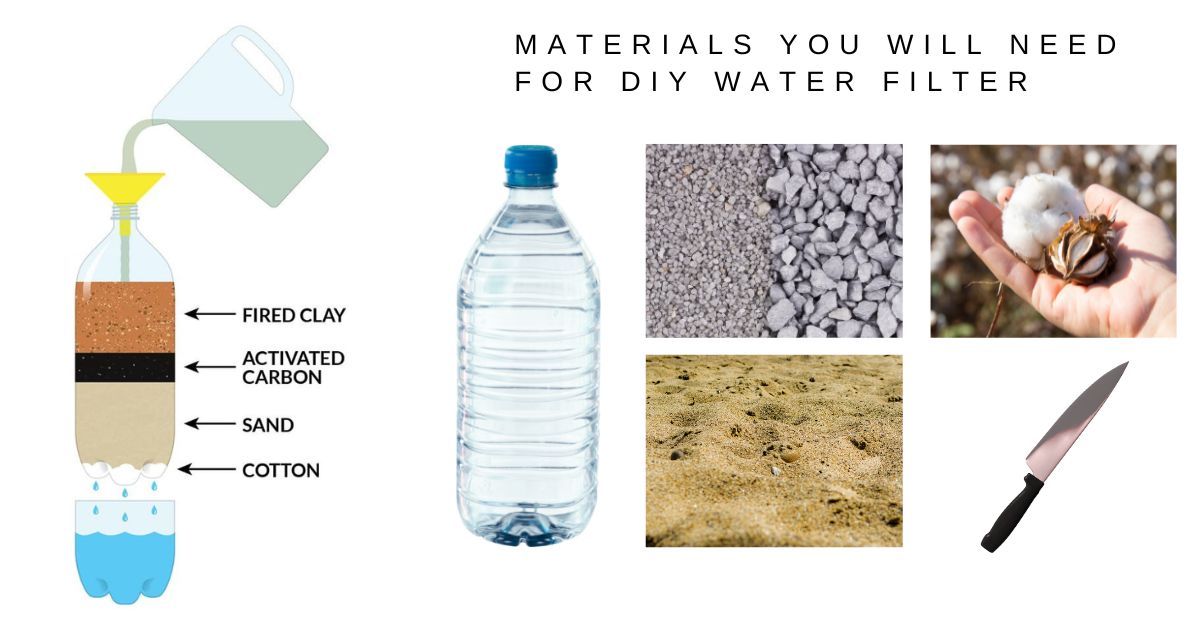
You can easily make your own water filter device by using, a 2 – 3 liters bottle. Coarse and fine sand. Coarse and fine gravel. Cotton. Кnife and a few minutes of your time. For better results add activated charcoal, but as this is not always available in Cyprus, you can skip it or make it on your own.
Why would you want to make a water filter?
Well, some people just love to do things on their own and want to create a basic water filter because it is an interesting project for them. Others may want to make a water filter to fill an immediate need – perhaps they are camping out in our beautiful Cyprus area and only muddy water is available.
Whatever your reason for wanting to make a water filter, here is how you can do it. Keep in mind that this hand-made filter is only good for clearing out mud and other visible particles in the water. It does not effectively remove bacteria or other contaminants that may be present.
You will need the following materials for making a water filter.
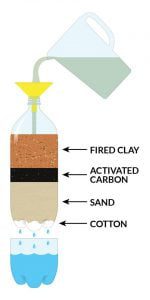
- A container. This could be, for example, a bottle of two to three liters capacity. If that is not available and you have to make do it with what nature provides, how about using the bark of a tree? Craft the bark into a cone with a small hole at the end and tie it so that it retains its conical shape. You now have an adequate container for the filter.
- Activated charcoal. This may not always be readily available in Cyprus, but if it is, it adds significantly to the filter’s capabilities.
- Coarse sand and fine sand (separate – not mixed together).
- Coarse gravel and fine gravel (separately).
- Cotton. Alternatively, you can make do with pebbles.
The water filter will function with the bottle in inverted position. Cut off the bottom of the bottle. This is where you will pour the water in, once the water filter is done.
Block the pour spout of the bottle (which is now at the bottom) with cotton. This is to prevent the filtering materials from falling out of the bottle. If cotton is not available, use a couple of inches of pebbles for this purpose.
Right above the cotton, put in about an inch of fine sand. On top of the sand, place a layer of activated charcoal. Follow that up with layers of coarse sand, fine gravel and coarse gravel in order from bottom to top.
Your water filter is ready for use.
Pour water into the top end of the filter and collect the filtered water at the bottom into another container.
The filtered water may be clear in appearance, but this very basic water filter will not remove many potentially dangerous contaminants. To make potable water, you need to further purify it.
Use the above outline of how to make a water filter to get clear water when you need it.
[UPDATE] Please check the alternative guide below submitted by one of our readers.
Instructions on How to make your own water filter version 2:
We all know the water we usually drink is collected from lakes, rivers, and other natural places. Therefore it must be extremely well “filtered” before people can drink it without any disease risk. This filtering process is in fact represented by several steps that water passes from lake water to clean water.
We will try to simulate the water purification process, but we won’t be using any harsh chemicals therefore the water we will obtain will not be safe for drinking. In order to start building your water purification system you will need several objects and some “dirty” water :
This is what you need for the second project:
- 2 liters of “dirty” water (from a lake, a swamp, any water older than 1 week or take some clear water and add some dirt to it),
- 1 bottle (two-liter bottle),
- 2 more bottles (1 with the top removed and the other with the bottom removed),
a recipient big enough for the “dirty” water, - 2 tablespoons of ALUM (Potassium Aluminum Sulfate – from a grocery store, it is known as “salt”),
sand (1+1/2 cups of fine sand – beach sand, 1+1/2 regular sand – bigger dimension of sand granules), - 1 cup of small rocks – aquarium rocks are recommended,
- 1 coffee filter,1 rubber band,1 tablespoon,1 large spoon, and cotton balls.
Now you can begin: pour the “dirty” water into that two-liter bottle. The next step is “aeration” which will allow gases to escape and also will oxygen the water. Place a cap on the bottle and shake it for about 30 seconds. Pour the water into the bottle with the top removed that you prepared before and then pour it back in the “full” bottle, repeat the operation about 10 times.
Next, we’re looking at coagulation, which is the process that makes the solid particles hold on to each other (chemical process). Once coagulated these particles can easily be removed. We will add two tablespoons of ALUM to the aerated water then stir slowly for about 5 minutes.
Now the particles will tend to stick one to another, forming bigger particles that will have fewer chances of getting through the filter. Once they got bigger the particles will “fall” to the bottom of the recipient, a process called sedimentation. The water will change its color and will become more clear.
Start building the filter:
Using the bottle with the bottom removed. On the upper side of the bottle attach the coffee filter (over the bottle) and to make sure it won’t fall off use the rubber band. Turn the bottle upside-down and place it into a recipient capable of retaining at least 2 liters of water. Put the small rocks into the bottle, the big granules sand over the rocks, and the fine sand on top of all that.
This is the filter you are going to use, but first, you need to “wash” the filter. Pour about 2 liters of clear water over the filter. You should pour that water from a small height so that you don’t disturb the top layer of sand. After the water gets into the recipient you must pour it away and make sure the recipient is empty before you start pouring the “dirty” water. Don’t pour all of your “dirty” water, use only the top ¾ of it.
The water you obtained should be very different from the one you began this experiment with. The last step of the process would be the chemical treatment of the water, which is dangerous and can only be made by experts. This kind of water filter can be built at home. It can be useful if you remain trapped inside the house and you’re out of clean water, but you have some source of dirty water.
For better results:
You can add some cotton balls to your filter. For the best results, you can use cartridges that are built just for that, filtering water. This way you can eliminate bacteria, chlorine, and heavy metals, making your water better than bottled water which some experts say is not as safe as producers claim.
Well, as we see, it is quite easy if we are at home, we have all the materials we need. What if we are lost in the wilderness? Water is the first thing we are going to look after, before sleep and food.
How to make a water filter in the wilderness?
You need several objects, you can try to find them or make them. The water might not be as clean as the one you obtain at home, but it’s good enough to keep you alive.
First, you need a recipient. Whatever “metal can” you can find or something like that. Put some holes in its bottom. If you can’t find the recipient you have to make it out of something. For example, take a large leaf and make a cone out of it. Make sure at the end of the cone there is still a small hole.
Place some small rocks as the first material at the bottom of the recipient/cone. Over it, you can put some gravel or sand, which you can find in the area. Try to find a big recipient, the more layers it can take the cleaner the water will be. If you can’t find small rocks you must place some grass over the rocks so the sand doesn’t get out through the rocks layer.
If you can’t build a filter large enough to clear your water you can pour it more than once through the filter. The best things you can hope to find are a metal cone and a metal can, as you see in the pictures.
Then you must take care of the bacteria in your water so that the filter doesn’t remove.
The most common way to kill the bacteria is by boiling the water. Then you have the unwanted chemicals that you have to remove. That’s the hardest part and usually close to impossible to obtain in the wilderness. You need other chemicals in order to neutralize those that the water contains. No matter how unsuccessful your water filter will be, at least you will survive (in real situations if you drink this kind of water you might get ill, but you will stay alive for at least a few more days, longer than if you don’t drink water at all).
A note on Reverse Osmosis:
Without going into chemical details, we will just note reverse osmosis as a filtration process used mainly for water. It is considered to be the safest water purification process. Here is our 5 stage Reverse Osmosis Economic System.
Related Links:
Reverse Osmosis Water Treatments Process
Reverse Osmosis Water Treatment
Home Reverse Osmosis System vs. Bottled Water: A Cost Comparison
Why are you looking for a home water filter?
The benefits of using shower water filter systems
Below is a link to an interesting Video on how to make a Water Filter:
Click here to Watch it on Youtube

Stavros is a professional water quality specialist and holds an extensive knowledge of various water filtration technologies, including reverse osmosis, water softeners, water purification systems and additional water treatment techniques for residential and commercial use. He has written extensively on the subject of water filtration and treatment, with his work appearing in industry publications such as Water Technology and Water Quality Products.
In addition to his professional work, Stavros supports the environmental sustainability and is committed to promoting eco-friendly water filtration solutions. He believes that everyone has to have access to clean, safe drinking water and is dedicated to helping people achieve this goal.
Stavros resides in Larnaca Cyprus with his family and enjoys sailing. He can be reached at tel: +357 99626069 and is available to provide expert advice on all aspects of water filtration systems, including installation, maintenance, and replacement filters.
- How to Use SodaStream Duo – Step by Step Guide - June 30, 2026
- 12 Easy Homemade SodaStream Recipes & Natural Soda Syrups - June 25, 2026
- Tankless Reverse Osmosis Systems Cyprus: Tankless vs Traditional RO Tanks - June 8, 2026